

Many of you may remember we refinished our kitchen countertops with a Daich Spreadstone stone coating kit in the winter of 2019. We have been incredibly happy with the durability of that product in our kitchen. A few months before refinishing those kitchen countertops we had used a faux “marble” kit from another company to refinish the countertops in two bathrooms. That other brand has not stood the test of time in the bathroom our teen daughters share.
*Daich Coatings provided the product used for this project. This post contains affiliate links.
You can view our past post DIY Countertop Refinishing Before and After with Daich SpreadStone Kit here. Our stone coated kitchen countertops are holding up so well, that I knew I needed to refinish the vanity in the girls’ bathroom with the Daich Spreadstone as well.
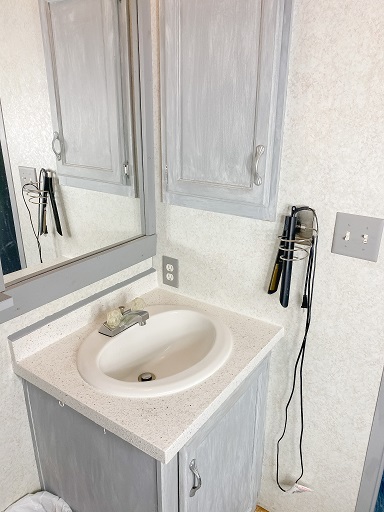
Peeling Bathroom Countertop – Before Photos
Although I made updates to two of our upstairs bathrooms by painting cabinets and refinishing countertops over two years ago, we are just now getting around to replacing flooring throughout the house. We started in the bedrooms of our two teenage daughters. The flooring we are using for most of the areas is Rigid Core from Home Depot. It’s a little different from the laminate my husband has installed in the past, so we decided to start in rooms visitors don’t see as often in case we made mistakes as we were learning to install.
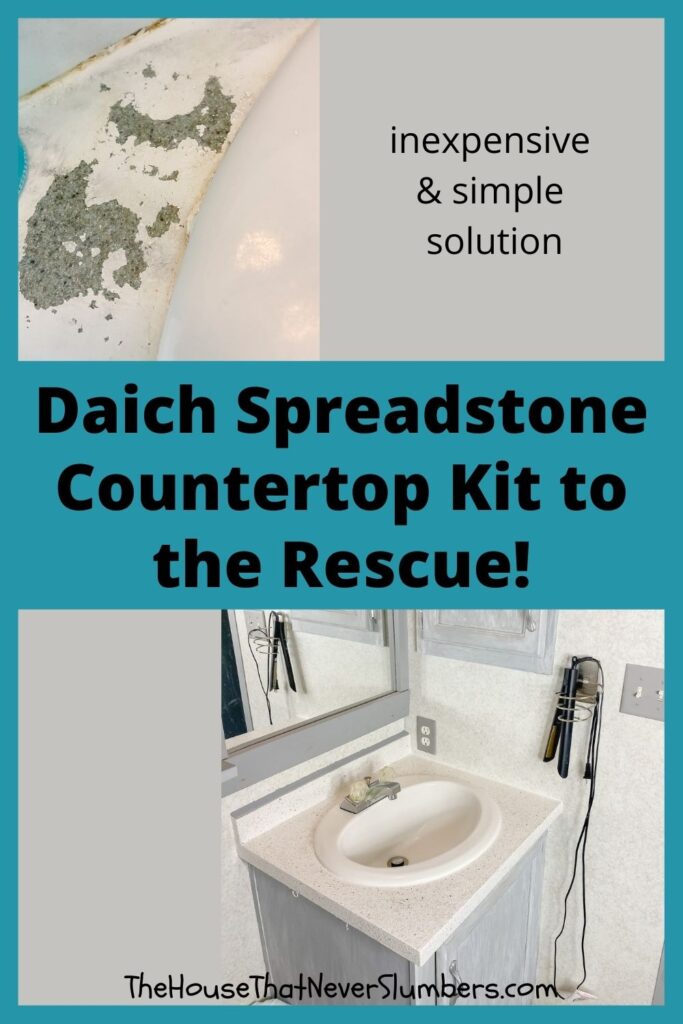
The bathroom between the two girls’ rooms was getting the same flooring. When we began to prep their bathroom for the new flooring, I realized the faux “marble product was showing A LOT of wear. I definitely didn’t want this complete bathroom transformation to be marred by the now peeling countertop on the vanity. You can see what I mean in these photos.

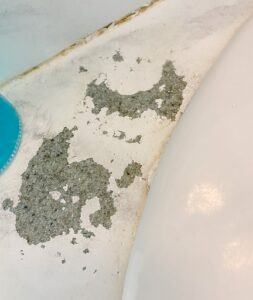

Remember that ugly moss green that was on the counters before I refinished them? It was showing through in several places. You can go back to the Easy “Marble” Countertop Refinishing post to see just how horrific that bathroom looked with the moss green counters and honey oak EVERYWHERE!
I knew I needed to act quickly with a solution to these bathroom countertop issues before laying the rest of the flooring to prevent damaging the new flooring later with drips.
What Damaged the Bathroom Countertop?
There’s no doubt the source of the damage to the bathroom countertop was my two teenage daughters who share that bathroom. More specifically, the damage was caused by there beauty routine.
At the very same time we refished the counter in that bathroom, we refinished the countertop in our mudroom bathroom with the very same product because the kit was enough for both bathrooms. I don’t think it’s a bad product altogether. I just think it’s not the right product for a surface that will experience heat on a regular basis.
The faux “marble” refinishing product is holding up fine in our mudroom bathroom. That might make you guess the mudroom bathroom gets less traffic than the girls’, but it actually doesn’t. The mudroom bathroom is right inside our back door. It’s opposite our laundry room, and it’s the most frequently used bathroom in our house for handwashing. When we’ve had bottle calves in the pasture here, that bathroom has been used for cleaning up before and after feeding. That bathroom is where we wash up after taking care of the ducks and chickens. That bathroom is also used by any visitors who swim here because it’s closest to the pool.
The frequency of use does not seem to be the problem for the faux “marble” kit from that other brand. The type of use must be the real test of its durability. The routine of two teenage girls getting ready for the day is likely what did in the faux “marble.” Whatever beauty products they use to wash their faces may have been a factor to some degree, but I suspect their straightener was the biggest culprit.
The spot where their straightener would rest while being heated constantly felt sticky to the touch. The faux “marble” kit was not made to hold up to heat. The good news is that Daich Spreadstone is made to take some heat.
Daich Coatings to the Rescue!
The Daich Spreadstone countertop refinishing product I used in the kitchen is holding up so fabulously, that I new it would be the simple solution to my teenage girl bathroom dilemma. The countertops still look amazing next to the stove, above the dishwasher, and under the toaster which are areas that have to withstand a bit of heat.

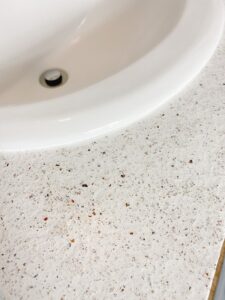
I was so excited to see the new Bright White option for the Daich countertop refinishing kit. It’s a much better fit in color for my daughters’ bathroom than the Natural White I used in the kitchen. If Bright White had been an option two years ago, I likely would have used it in their bathroom from the beginning.
I won’t go through all the steps to applying this amazing product in this post because I’ve already given much more detail here in the prior post about refinishing the kitchen. I do want to mention that prepping the surface when refinishing a laminate countertop is much easier than prepping the surface if you’ve applied another product that didn’t work out.
Save yourself some time and effort, and learn from my mistakes. Don’t you love the way it turned out?! No more peeling!
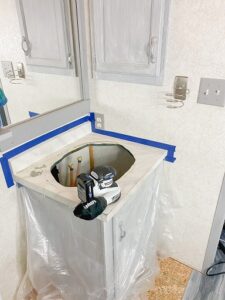
When applying the Daich Spreadstone straight onto laminate counters, I simply had to scuff up the old countertops a bit with the handheld sander. This time, I had to work much harder to sand away the sticky and peeling places. The faux “marble” kept wanting to gum up on the surface and leave sticky chunks of paint. I had to make sure all those were cleared away before applying the Daich primer because I did not want to create a situation where the old product peeled or bubbled underneath and ruined my new finish.

I ended up using Klean Strip liquid sander/deglosser to work through some of the old product before doing a lot more sanding. This was a very messy task and one I would rather avoid in the future. I have learned my lesson to just start with Daich to avoid the extra work of trying to cover another product later.
One word of advice after using this product multiple times – do an extra coat of the clear coat! You will have plenty of clear coat in the kit. It goes the farthest of all the cans of product. The instructions say just two coats are needed. That is likely true in most cases if you do a great job of covering every bit. I missed a few tiny places in my kitchen, but I was so anxious to have the use of my kitchen again, I didn’t want to wait the four more hours to apply an additional coat. DO THE 3RD COAT! If I had taken the time for a third coat, I’m confident I would not have missed a few places. I definitely applied a third coat in this bathroom and the master bathroom.
[Warning – You may notice a different faucet in the after photos in this post. There’s no conspiracy here, folks. This really is the same bathroom. The great faucet debacle happened because I decided to refinish the countertop in my master bathroom at the same time. When we returned the sinks, we accidently switched them. Oops. The girls are not happy because their other faucet was all stainless steel and easier to keep clean. We’ll be getting them another one, since I actually hate these plastic knobs as well and don’t want them back. I just need to find another one cheap at the Habitat for Humanity Restore. This is the last remaining original manufactured home faucet in the entire house. They are super cheapo.]
I recorded a video at each stage of this project because I was confident that I knew what I was doing this time, since this isn’t my first rodeo with using Daich coatings. I will be adding the video to the The House That Never Slumbers Youtube channel once it’s edited. I hate editing video, so it may be winter before I get to that. Subcribe to our channel and hit the notification bell if you are interested in seeing the video footage when it’s finally posted.
Pin this!
I’m a designer who specializes in economical solutions for regular people. This sounds like a great “upgrade” from traditional resurfacing kits. Good read. Thank you.
Thanks for stopping by! We’ve been very happy with this countertop refinishing product. It made a huge difference in our kitchen.
I have always wondered if this works!! Great Read!! I have decided to try it in our bathroom!!!
I really love it! You will have plenty of clear coat in the kit. Even though it says only two coats of the clear coat, do an extra coat. In my kitchen, I missed a few tiny spots that could have been covered with an extra coat. If you have any questions as you’re working, just message me.